Care and Repair of Your Computer:
A Top-down Strategy for the Novice
James A. Levin
College of Education
University of Illinois
Naomi Miyake
School of Computer and Cognitive Sciences
Chukyo University
JAPAN
http://tinyurl.com/levin-miyake-1996
A version of this paper (Levin & Miyake, 1996) was published in the ISTE journal Learning and Leading with Technology in 1996.
Computers are complex devices, often intimidating to novices. How can a novice
best come to understand how a computer works? A novice initially views a
computer system as a "black box," which (usually) responds to certain inputs
with certain outputs. A "black box" is something that you think about in terms
of its functional properties, without considering its internal structure.
Novices think that they need to learn all about the low level internal
structure in order to "understand" a computer, and thus be able to deal
effectively with them. This notion is not true.
Experts are able to think about a complex system like a microcomputer at many
different levels (Miyake, 1986).
In computers, many of these levels correspond
to the physical components: we can understand a computer at the level of an
individual chip, or at the level of a larger functional unit like a single
printed-circuit board, or at a large component unit level like a disk drive,
printer, keyboard, etc. Typically, explanations to novices of how computers
work start with low level units like the CPU, RAM, ROM, I/O, etc., leaving the
novice with a jumbled alphabet soup of acronyms. Then once these units are
introduced, the explanations show how they are interconnected to form higher
level units, until the whole computer system is constructed.
This "bottom up" approach to instruction is very common: in teaching writing,
schools start by teaching the formation of individual letters, then small
words, then short sentences, paragraphs, etc. Only relatively far along do
students get introduced to a functional unit of communication like writing a
story or a letter. However, this is not the only approach: tutorial and
apprenticeship settings typically start with the novice in the context of a
large meaningful task, and the novice then proceeds to learn the structure at
smaller and smaller levels until he/she masters the low level components. This
we can call a "top down" approach.
What does this means in the domain of understanding how computers work? We
will find that not only does a "top down" instructional strategy to
understanding computers work well for novices, but it has the added bonus of
giving even novices a powerful conceptual strategy for the diagnosis and repair
of problems with computers.
Level O: The Whole Computer System
The set of levels we will explore starts at the top with the level of the whole
computer system. This is the level that a novice usually starts with: when
approaching a new computer system, the novice only knows that certain actions
(plugging it in; turning it on; typing on the keyboard; moving the mouse) cause
certain actions (characters or graphics appear on the display; the disk spins;
the printer prints). The novice knows there is internal structure but may not
know anything about what that structure is. As long as everything works, the
novice may not care about the internal structure. However, when trouble
strikes and an action by the novice does not produce the expected action
by the computer system, then the novice is stuck.
Even a novice with a understanding at this level can take certain repair
actions, which will fix a surprisingly large percentage of problem situations.
Figure 1 below shows the Level 0 understanding.
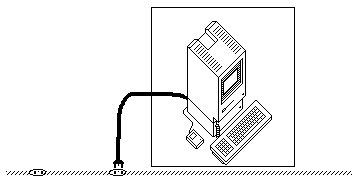
Figure 1: A Computer System
Note that though most of the structure of the computer system is within the
black box (and thus not obvious at this level), this diagram makes very salient
the connections between the computer system and the rest of the world.
Although these connections are "obvious," they are often overlooked in the
process of troubleshooting. ." . . one of the biggest complaints seasoned
technicians have with those fresh out of school: The first thing they do is
take the computer apart and scrutinize the schematics, when the very
first thing they should do is check out the obvious, like, is it plugged in?"
(Thomas, 1984).
There are two troubleshooting actions to try when trouble occurs, both of which
we will use at each of the different levels of understanding a computer.
Repair action 1: Check the Connections.
Each level of understanding consists of some set of functional units,
interconnected in some way. A common cause of trouble is in these connections.
Either a connections does not exist at all, or a connection is not tight
enough, or the wrong things are connected together. At a Level 0
understanding, there is often only one connection to check: the electrical
power connection between the system and the wall plug. Although this is
obvious from the diagram above, it is often not very obvious in the real world,
since power plugs and outlets tend to be out of the way and behind things.
Television repair people find that there is a peak of calls for repair into the
spring, closely associated with "spring cleaning." They are told on the phone
"The TV doesn't work! Come fix it." Then they find that someone who was
vacuuming behind the TV has accidentally knocked the power plug out of the
outlet. The obvious is often not obvious.
When a computer system stops working, a Level 0 analysis points you toward
checking the power connection. A surprisingly large number of problem cases
can be fixed through this simple action, which even a complete novice can
perform.
Repair action 2: Swap Identical Parts.
When checking connections does not work, it is time to move on to repair action
2: Swap identical parts. If the computer system doesn't work, try plugging it
into a different electrical outlet (which is presumably functionally
identical). Sometimes the "broken" computer will suddenly come to life after
being moved to a different power outlet, because the problem is in the outlet.
A fuse may have been blown, or a circuit breaker may have been tripped, or the
particular outlet may not be wired up right, or the power to that outlet may be
controlled by a switch on the wall that is turned off. In any case, if you
switch the computer system to another outlet and it works, you can rule out the
computer as the source of the trouble, and then proceed to track down the
problem in the power outlet.
One last step in this repair process is to swap the parts back again. Sometimes
the computer will work properly in the original outlet. How can that be?
Well, the problem may really have been in the connection, but not caught in
repair action 1. That is, the computer may have been plugged in, but not far
enough or not securely enough. Just the process of unplugging and replugging a
connection will often establish a better connection, since in that process, the
metal parts rub against each other, scraping away any corrosion and making a
better electrical connection.
If you have ruled out a bad electrical outlet or loose power plug as the
problem, you can proceed to a Level 1 analysis.
Level 1: The components of the computer system.
The next level of analysis to focus on is the level of the major components of
a microcomputer. These differ across different kinds of microcomputers, but
for the many computers, the major components are the computer and its
peripherals (the monitor, the disk drive, the printer, the keyboard, the mouse,
etc.). Figure 2 shows a set of peripherals, all connected conceptually to a
computer in the center.
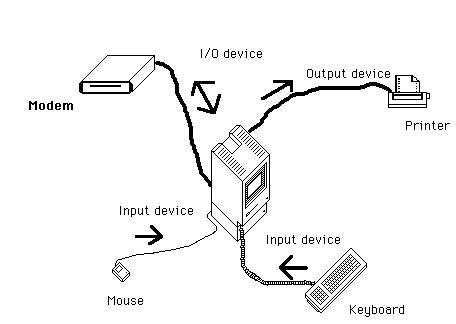
Figure 2: Computer components within a computer system
The arrows in Figure 2 show the flow of information. This diagram represents a
second, more detailed understanding of how a computer works. There is now an
explanation at this level for how characters are sent to a remote computer
through a modem when keys are pressed on the keyboard. The information from
the key press goes from the keyboard to the computer, which sends out the
information to the modem. Obviously there are much more detailed explanations
possible at lower levels, but this is a perfectly adequate explanation for
certain purposes. For example, this level of understanding allows you to
troubleshoot problems that you have identified in the Level 0 repair previously
as being in the computer system.
1. Check connections.
At this level, there are more connections to check, which is more work, but
also raises the probability that you will find and fix the problem. Generally,
the parts are interconnected with cables of various kinds, sizes, and colors.
Even if you don't really know what you're looking for, the functional knowledge
that there must be an interconnection between each of the peripherals
and the computer can guide you to find and check the connection. Sometimes a
cable will be loose at one end or the other, and all you have to do is tighten
it. Other times, you will find a cable connected at one end and hanging loose
at the other. Then you have to find a likely place to reconnect it. Usually
there is only one possible place.
You often can focus your attention to some cables, ignoring others, based on
symptoms of the problem. For example, if your computer works but just doesn't
print anything, you can focus on the printer cable. If your disk drives spin
when you turn on your computer, but nothing appears on the monitor, check the
cable between the computer and the monitor. Sometimes following the flow of
information through the system at this level of analysis helps locate the place
where it doesn't flow.
2. Swap identical parts.
If checking the connections doesn't help, try swapping identical parts. If you
have a second identical computer system available, this is straightforward. If
the monitor doesn't seem to work, try another monitor on your computer. If it
works, you have evidence that the problem is in the monitor. Try your original
monitor on the other computer. If it still doesn't work, you have even
stronger evidence. Try it back on the original. If it still doesn't work,
then that's probably where the problem lies.
If your monitor works on the other system, and the new monitor doesn't work on
your computer system, then that's evidence that the problem is in the rest of
the computer system, not the monitor. In either case you've localized the
problem. Continue swapping parts until you can identify the trouble as being
within one (or more) of the components.
Partial success from partial troubleshooting.
At this point in the troubleshooting process (or at any other point), you can
stop and call upon more expert help. But even if you haven't fixed the
problem, your efforts have not been in vain. If you have to take the computer
somewhere to be fixed, you can take just the components you've identified as
flawed, not the whole system. You've ruled out many of the "obvious" problems,
and have probably lowered the cost of having the system fixed. And in some
cases, you can find a temporary replacement so that you can continue to work
while the broken component is being fixed.
The advantage of this "top down" approach to understanding and troubleshooting
is not only that novices can use it almost immediately, but also that partial
execution of the process is useful. As you proceed, you narrow down the
problem, even if you haven't identified it. So a person, even a novice, can
proceed as far as he/she is comfortable, and still get some satisfaction out of
solving some problems and localizing others to subcomponents.
Level 2: Printed circuit boards.
If you have localized the problem as being within the computer, you can choose
to proceed to further levels of understanding and troubleshooting. The next
functional level or organization often corresponds closely to the physical
level of separate printed circuit boards. Figure 3 shows the organization of a
typical microcomputer at this level.
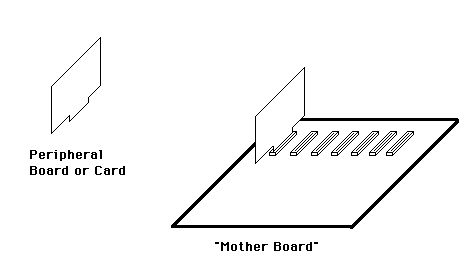
Figure 3: PC Boards within a Computer
The understanding at this level is in terms of the flow of information among
these functional units, some of which are equivalent to boards or cards, and
some of which are equivalent to subareas of a board or card. This is shown in
Figure 4.
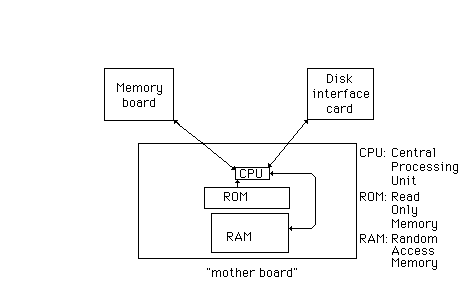
Figure 4: A Level 2 Structural Understanding
To conduct diagnosis and repair at this level, you will need to open the
computer (which is not very easy with some microcomputers). But before you do
that, here are some warnings.
First warning: Be sure to turn off the power before opening any
component. Some components, such as the monitor, have dangerously high
voltages inside them which persist even when unplugged and thus should not be
opened by non-experts. Most microcomputers, however, don't contain voltages
that are dangerous to you. However, removing and replacing parts inside a
computer when the power is on is dangerous to the computer. If you
follow the simple rule of always turning off the computer before opening it,
you can proceed to diagnosis and repair at the level 2.
Second warning: Some computer components are sensitive to discharge of static
electricity. This is the kind of electricity that shocks you when you walk
across a rug on a dry day and then reach for a door knob. So, when you open
the microcomputer, remember to first touch something inside that is made of
metal before touching anything else. This will discharge any static
charge, and allow you to proceed safely.
If you're going to be doing a lot of work with static-sensitive components, especially in dry winter weather, you may want to get an anti-static mat and a grounded wrist strap.
1. Check connections.
At level 2, cables and wires will have almost totally disappeared. However,
there are still electrical interconnections to check. Many printed circuit
boards are made with a row of metal fingers along one edge, which plug into a
"slot." When plugged in, these fingers rub up against metal fingers in the
slot to make electrical connection. If these fingers don't touch, then there
is no connection. Check that the boards are firmly seated in the slots.
Over time, corrosion builds up on the metal fingers, and then they don't
conduct electricity well. One way to solve this problem is to "re-seat" the
boards. That is, you rock a board back and forth lengthwise to ease it out of
its slot, then rock it back and forth to reinsert it back into the slot. Often
doing this for the boards in your problem computer will solve the problem.
(Note: this is in effect what you do when you have a problem with your
television if you "fix" it by banging it on the side. Re-seating the
components in your computers is a much more sophisticated way to proceed.)
2. Swap identical parts.
If you still haven't solved the problem, then if you can get an identical
computer, try swapping identical boards. Since there may be many different
boards, you may want to keep a record of which you have swapped so far and what
results you've seen. Mark the boards from your problem computer with an X in
pencil, and then erase the X from each board that works when swapped to the
other computer. Eventually you should be able to identify one (or rarely, more
than one) board containing the problem.
Level 3: Chips.
Again, you can stop at that point, and take your malfunctioning board to an
expert for repair. Note that it is easier to carry a board to a repair shop
than your whole computer, and will probably be less expensive to fix, since
you've done a part of the repair process. In fact, today, this is usually the
level at which even expert repair people stop, just replacing a defective board
and sending it back to the manufacturer for repair (or to be discarded into a
landfill).
However, if you still have the energy, you can sometimes proceed one more level
of troubleshooting, to the level of the integrated circuits, nicknamed "chips."
These are the little black rectangular pieces of plastic that you find in great
numbers inside a computer, each with many little metal legs. Each chip has an
associated function, and boards are constructed by interconnecting particular
chips in particular ways. Figure 5 shows this level of organization for chips
on a typical printed circuit board. A circuit diagram for this board would
show the interconnections, and thus specify this level of understanding of the
board.
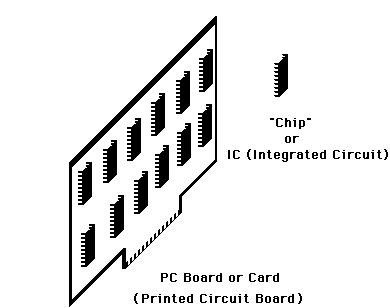
Figure 5: Chips on a Printed Circuit Board
1. Checking Connections.
Again there are no wires or cables involved at this level. Instead, those
little insect legs are the connectors. Some microcomputer have their chips
soldered directly to the printed circuit boards. If this is the case, then you
can stop here, as you'll have to take your defective board to an expert for
repair (or more likely, replacement). However, some microcomputers have their
chips inserted in sockets. These are little rectangular boxes with a hole for
each leg of a chip.
Again, corrosion builds up between the leg of a chip and the hole of the
socket. To check this, try re-seating the chip. The easiest way to do this is
to place the board on a flat surface, and push gently down on each chip. This
will move the legs slightly, cause them to rub against the socket and cut
through any corrosion. Replace the board and try the computer again.
2. Swap identical parts.
If re-seating the chips doesn't work, and if you have an identical computer,
you can try swapping the chips. Again, if the chips are soldered in, this is
usually not worth doing. But if they are socketed, then you can gently pry up
on a chip, lifting alternately from each end of the chip, until the chip gently
pops out of the socket. Do the same with the identical chip on the other
board. Then very gently, insert each chip into the other board, taking
care to replace them in the same direction. Before you push down on a chip,
look closely to see that each leg is in a hole. Then push down gently, until
it is inserted firmly. (Note: Boards are usually designed so that the labels
on the component chips are all oriented in the same direction. Check to see
that this is so, and if so, use that as a guide for replacing the chips in the
correct direction. Otherwise, you will have to mark the chips and be careful
to reinsert them in the same direction.)
Record keeping is critical here - mark each chip on the problem board with a
penciled X, then erase it when you rule it out as a problem. If you have no
idea where the problem might lie, you may want to use a "bisection" strategy.
Swap half the chips on a board. Then, if the problem transfers (your board now
works and the other now doesn't), then you can narrow down the problem to the
half transferred. Erase Xs from the chips still on your original board. Now
swap half of the half (the ones on the other board with Xs) back to the
original board. If the problem doesn't transfer, then rule out those
transferred. In this way, you can localize the problem in just a few of these
bisections, since you rule out half the remaining suspected chips in each
cycle.
At this point, if you have identified a chip as the problem, you can march into
your local electronics store, holding the dead chip in your palm, an say "I
want one of these." The clerk may look closely , and say , "You want a
74LS125?" And you can say, "Yes, please" with a straight face, pay your 60
cents, go home and insert your new 74LS125 (gently) and watch your computer now
work.
What is a 74LS125? This points us to the next level of understanding, the
individual integrated circuit.
Level 3: Individual integrated circuit chips.
There's the level of understanding a single integrated circuit, shown in Figure
6, with a functional understanding of what the IC does, and a structural
understanding expressed by the circuit diagram of the IC.
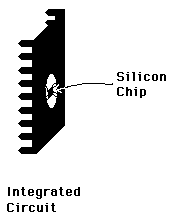
Figure 6: Individual integrated circuit.
If you plan to build or modify a computer, you'll need to understand the system
at this level and at even lower levels: the level of the logic gates that make
up an integrated circuit, or the level of transistors and capacitors within
each logic gate, or the quantum boundaries that make up each transistor, etc.
However, for most other purposes, an understanding at higher levels is adequate
to support skilled functioning. Certainly the more levels at which you
understand how a computer works, the deeper your understanding. But with the
"top down" approach to understanding and troubleshooting described here, you
can stop at whatever level you find satisfies your needs. In addition, there
is no such thing as a "complete understanding," since there are always yet
lower levels of understanding. Thus, "understanding" is usually specified
relative to a level that is sufficient for whatever goals the understander has
(Miyake, 1986).
Summary
The most important lesson to learn here is an overall perspective on
understanding and problem solving. The usual attitude is to assume that if a
complex device like your computer doesn't work, then you're helpless and have
to draw upon "experts" to make it work again. This is a fallacy: a high
percentage of problems that occur with your computer (or any other technology)
can be solved by you, even if you think you know nothing. By
approaching the system from the most global level, and successively narrowing
down the problem, you can often solve the problem. Two diagnostic actions,
checking connections and swapping identical parts, can be applied at each
different level of understanding, until either the problem is solved or else is
localized so that it can be more easily fixed by an expert. You can
understand your computer to a certain level, and be an expert at solving
problems with your computer even if you are not an expert at
microcomputers or microelectronics.
References
Levin, J. A., & Miyake, N. (1996). Check connections, Swap identical parts: Top-down hardware repair for novices. Learning and Leading with Technology, 23(8), 53-56.
Miyake, N. (1986). Constructive interaction and the iterative process of
understanding. Cognitive Science, 10(2), 151-177.
Thomas, L. (1984). Breaking in. Whole Earth Software Review, 3,
60-64.


